

MQTT has quietly become the backbone of modern IoT systems. From smart homes to industrial automation, it provides a lightweight, reliable way to move sensor data from devices to dashboards, databases, and applications.
If you have ever wanted to connect a temperature sensor to a website, log environmental data to a server, or trigger automations from physical events, this guide will walk you through the fundamentals.
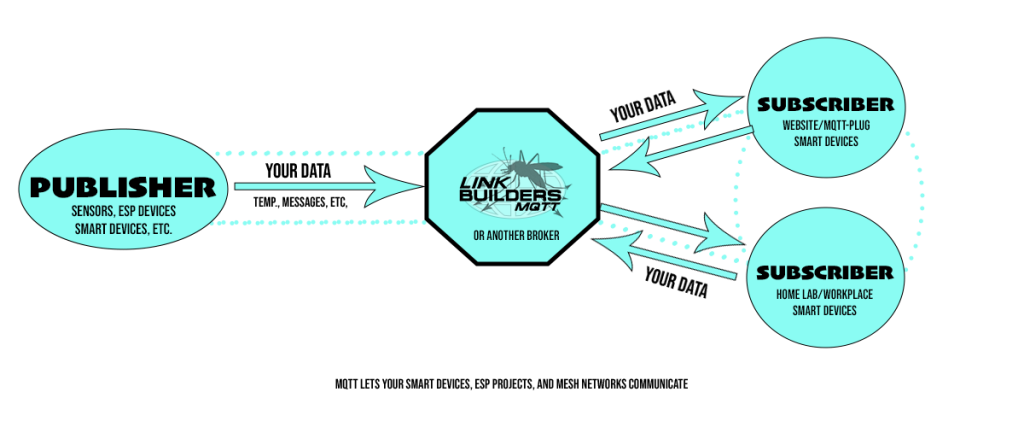
What Is MQTT?
MQTT; Message Queuing Telemetry Transport; is a lightweight publish/subscribe messaging protocol designed for low-bandwidth, high-latency, or unreliable networks.
Instead of devices talking directly to each other:
- Devices publish messages to topics
- A broker receives and distributes those messages
- Other devices or applications subscribe to topics
The most common open-source broker is Eclipse Mosquitto; lightweight, stable, and easy to deploy on a VPS or even a Raspberry Pi.
What You Need
To build a simple sensor-to-MQTT system, you only need a few components:
1. A Microcontroller
Popular options:
- ESP32
- ESP8266
- Arduino boards with WiFi shields
The ESP32 is ideal; inexpensive, WiFi-enabled, and powerful enough for most sensor applications.
2. A Sensor
Common beginner-friendly sensors:
- DHT22; temperature and humidity
- DS18B20; waterproof temperature
- PIR motion sensors
- Light-dependent resistors (LDR)
3. An MQTT Broker
You can:
- Self-host using Eclipse Mosquitto
- Use a managed MQTT service like Link Builders MQTT
- Run it locally during development
You will need:
- Broker hostname
- Port (typically 1883 for non-TLS; 8883 for TLS)
- Username and password
How MQTT Topics Work
Topics are structured strings, like folders:
home/livingroom/temperature
warehouse/freezer1/temp
public/sensors/dht22
Good topic structure makes systems scalable.
For example:
public/esp32-001/heartbeat
public/esp32-001/temp
public/esp32-001/humidity
This allows dashboards or automations to subscribe to:
public/esp32-001/#
The # wildcard captures all subtopics.
Wiring a Simple Temperature Sensor
Example; ESP32 + DHT22
Basic wiring:
- VCC → 3.3V
- GND → GND
- DATA → GPIO 4
- 10k resistor between VCC and DATA
Once wired, install in Arduino IDE:
- DHT sensor library
- PubSubClient (for MQTT)
Example Code: ESP32 Publishing to MQTT
Below is a simplified example:
#include <WiFi.h>
#include <PubSubClient.h>
#include <DHT.h>#define DHTPIN 4
#define DHTTYPE DHT22const char* ssid = "YOUR_WIFI";
const char* password = "YOUR_WIFI_PASSWORD";
const char* mqtt_server = "your-broker.com";WiFiClient espClient;
PubSubClient client(espClient);
DHT dht(DHTPIN, DHTTYPE);void setup() {
  Serial.begin(115200);
  WiFi.begin(ssid, password);  while (WiFi.status() != WL_CONNECTED) {
    delay(500);
  }  client.setServer(mqtt_server, 1883);
  dht.begin();
}void reconnect() {
  while (!client.connected()) {
    client.connect("esp32-client", "mqtt_user", "mqtt_pass");
  }
}void loop() {
  if (!client.connected()) {
    reconnect();
  }  client.loop();  float temp = dht.readTemperature();
  float hum  = dht.readHumidity();  String payload = "{";
  payload += "\"temp_c\":";
  payload += temp;
  payload += ",\"hum\":";
  payload += hum;
  payload += "}";  client.publish("public/sensors/dht22", payload.c_str());  delay(10000);
}
Every 10 seconds, the ESP32 publishes JSON data to your broker.
Viewing the Data
You can verify data flow using:
mosquitto_subcommand-line tool- Node-RED
- Custom dashboards
- WordPress MQTT viewers like MQTT-Plug
Example command:
mosquitto_sub -h your-broker.com -t public/sensors/dht22 -u mqtt_user -P mqtt_pass
If everything is working, you will see JSON messages streaming in.
Best Practices
1. Use TLS in Production
Use port 8883 and proper certificates. Avoid plain-text credentials on public networks.
2. Structure Topics Carefully
Design for scale; avoid flat topic trees.
3. Use JSON Payloads
Structured data makes automation and dashboards easier.
4. Set Keepalive and Last Will
MQTT supports “Last Will and Testament” messages; this allows your system to know when a device goes offline.
Example:
client.connect("esp32-client", "mqtt_user", "mqtt_pass",
               "public/esp32-001/status", 0, true, "offline");
Then publish "online" after connecting.
Where This Becomes Powerful
Once sensor data is in MQTT, you can:
- Store it in a database
- Trigger alerts if temperature exceeds a threshold
- Send email or SMS notifications
- Display real-time dashboards
- Feed it into analytics systems
This is how simple sensors evolve into:
- Environmental monitoring systems
- Cold chain tracking
- Home automation
- Industrial telemetry
- Community mesh data networks
Self-Hosting vs Managed MQTT
If you are experimenting; self-hosting is educational and inexpensive.
If uptime, TLS, monitoring, backups, and scaling matter; managed infrastructure removes operational overhead.
Key principle:
If running infrastructure is your product; self-host.
If it isn’t; don’t.
Final Thoughts
Simple sensors combined with MQTT create an incredibly flexible foundation. With just:
- A $5–10 microcontroller
- A $5–15 sensor
- A broker
You can build systems that scale from hobby projects to enterprise telemetry platforms.
Start small. Publish one sensor reading. Watch it move through the broker. Subscribe to it from another device.
Once you see that first message appear, Congratulations, you are no longer experimenting; you are building a distributed system.

Web developer, field recorder, electronics experimentalist.
Michael Winchester Design | (562)283-5688
